
SylverFyre's Unreal2 XMP PLayguide
For a playguide to UT2k3 why not visit The Munkeehaus Guide
First of all, watch the tutorial provided with the game. Yes it's long winded but it provides all the information you need to get up and running with an idea of what to do in the server. When you've tried a game or two, revisit the tutorial, it can be browsed so you can ignore the things you picked up on properly the first time around.
THE BASICS:
If you're not used to first person shooters online (only played Unreal2 single player for example) then you need to learn to keep moving. A stationary target is a sitting duck and won't live long with enemy snipers around. You can even move slightly while hacking, just keep aiming at the object and don't get too far from it. XMP allows your player to sprint for short bursts at a cost of adrenaline (Shift key by default) and you have limited jumpjet capability by hitting jump and jump again while your in the air. This costs some of your personal energy. Dodging is important but easily achieved by double tapping a movement key to quickly leap in that direction, this can be combined with the jumpjet by hitting the jump key in mid dodge.When you approach an item you can use, eg a vehicle or a hackable item, parts of it will display an orange grid on the area to centre your crosshair on. When you are close enough the item you're centred on will turn to a green grid, this is handy for selecting which part of a vehicle to enter.
OBJECTIVE:
I know this is covered in the tutorial but I'll repeat it here in writing.
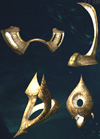
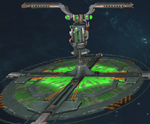
There are four artifacts, two placed in each node of the red and blue teams. In order to win the game a team must "register" all four by taking the enemies artifacts from their node by running through it (one player can only carry one at a time) and successfully returning it to his teams node. A teams node can only register artifacts when it is online, this requires the team to have more than 800 units of energy available to it. Successfully winning a map requires defense of your artifacts combined with capturing and returning the enemies while maintaining enough power to your artifact node.
CLASSES:
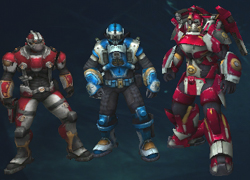
Left to right in pic: Ranger, Tech and Gunner
Three player classes are available to all and can be chosen as you wait in a respawn queue at a deploy point by pressing the 1 (Ranger), 2 (Tech) or 3 (Gunner) keys. Each class has it's own strengths and weaknesses detailed here:
Ranger:
+ Fast and nimble with a rapid running speed and uncatchable when using a jet-dodge.
+ able to heal himself on the move (assuming you have available energy).
- Low health and armour make his best defence to stay away from the enemy.
Weapons - long range sniper rifle, short to medium range pistol, anti-machinery Shock Lance, Frag & Smoke Grenades.
Ability - can heal teammates by "Using" them beyond the one point revive that other classes can manage, can also drop health packs if enough energy is available.
Description - Ranger is all speed and hitscan. Using the sniper rifle is godly (2 shots kills anything) but takes some skill to track properly in the current high-ping environment. Smoke grenade is VERY useful, if only to screw your opponent's framerate. Its good to drop one on a generator or deploy point before you start hacking. Health packs heal 25 points. Maintains pretty much the same capabilities for the whole game, least energy-dependent of the classes. Most effective at long range, can be effective up-close if you're VERY nimble with the controls. I do not advise using this class until you master the other ones though.
Tech:
+ Good all rounder and very fast at hacking.
- Can have problems in combat against other classes, doesn't have the range to tackle snipers or the armour to stand toe to toe against enemy Gunners.
Weapons - Assault Rifle, Shotgun, EMP & Toxic Grenades, Minigun & Rocket autoturrets, Force Wall Generators.
Ability - can repair teammates shields by "Using" them, can revive dead teammates though only to 1 healthpoint and can drop shield packs if enough energy is available.
Description - Techs are the best all-around class, especially if you're new. The assault rifle is good if you can track a moving target, more powerful secondary is OK for deployable destruction, but its largely inaccurate against players. The shotgun is the key weapon, the primary doesn't show hits well, but it has a fairly fast rate of fire and a longer range than you think. The secondary incendiary is good for blinding the opponent and eventually killing them. Both modes are at their most effective within 6 feet, though the secondary will kill you as well at point-blank. The EMP grenades damage player shields and vehicles (2-4 direct hits kills vehicles). The poison grenades can be deadly in a box, and covers a large area. Good for getting people to move. Supply packs only charge a few points each.
Gunner:
+ Very heavy armour and weaponry, can take a pounding and dish out the pain.
+ able to resupply himself on the move (assuming you have available energy) so there's no excuse for running out of ammo.
- Low speed means chasing an enemy is impractical, best pound them while they're close.
Weapons - Rocket Launcher, Flamethrower, Incendiary & Concussion Grenades, Landmines & Laser Tripmines.
Ability - can resupply teammates by "Using" them and drop ammo packs if enough energy is available.
Description - Gunner is a good choice for new players. Slow hack and move speed, but makes up for it with sheer firepower, toughness and infinite ammo (once your team has enough energy to turn on supply packs). Rocket primary is most effective, and best used while airborne or up high so you get splash damage to the target even if you miss a direct hit. Two direct or near direct hits kill a Ranger at full health. Three kills a Tech. Takes five to kill another Gunner though, Gunner vs Gunner fights can take a while. Rocket secondary locks on to targets by holding down the button, can aquire multiple targets too. Not very useful mode though unless you just want to get someone's attention. Decent vs slow vehicles. The flamethrower is excellent at VERY close range, but remember to stop flaming when you don't know where your target is.
Gunner incendiary grenades do a lot of damage and are good for cooking a target running after you. The concussion grenade will toss targets (VERY FAR if they are airborne) and blind them. Useful vs rangers and pursuing groups. The more direct the hit, the longer the blindness lasts. This hurts you too though so keep it at a distance.
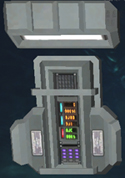
HUD:
Situational awareness is vital in XMP, moreso than most other Unreal engine games.
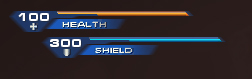 In the top left corner is your health and shield status, keep an eye on this especially if you're carrying an artifact. You don't want to risk engaging in fights if you're not topped up healthwise.
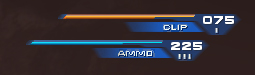 Top right shows your ammo status, the top row is the amount in the current clip and the bottom is the total amount remaining. It's worthwhile reloading (R by default) if you're out of combat as you don't want to engage the next enemy with only a few rounds left before reload time.
 The bottom left shows a variety of things, least of all is the icon in the corner showing which team colour you're playing along with an icon for which class. Above that is a blue personal speed gauge with a numerical value and an orange adrenaline bar, this is what gets used when you sprint. The remaining four icons here refer to the status of each artifact. It's background colour shows which team the artifact is registered to and remain lit steadily when the artifacts are in place. When an artifact has been stolen its icon will flash and the announcer will inform you of this, an artifact which has been dropped stops flashing but the background remains dim until it is returned to the node or picked up again by another enemy.
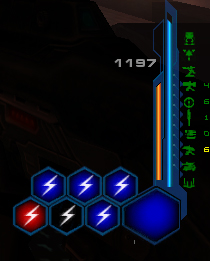 Energy status takes up the bottom right of the display. Personal energy is shown in the orange bar and team energy in the blue bar and numerical value. The icons next to the blue bar show what is available with the currently available team energy. Finally there are icons for each generator in the map, denoted with a lightning symbol, that change colour according to which team currently controls them.
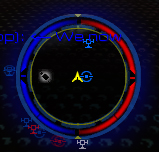 The radar display is located in the bottom centre of the screen and can be handy for locating where that teammate is who just shouted for a medic. Remember the following:
- Enemy vehicles and players will not appear on the radar.
- Friendly vehicles appear in team color. Unoccupied vehicles are white.
- Friendly players appear in white/black icons. Rangers are crosses, Techs are spanners, Gunners are bullets.
- Players needing supplies show a green icon indicating the type of resupply they need (eg a cross for health, a bullet for ammo). Players needing revival show a green skull. In the HUD, the resupply icons are yellow and the skull is white.
Finally if you see triangles appearing on your HUD that means your being targeted by a Gunners rockets, when they start to flash they've been launched, now would be a good time to take cover.
WEAPONS:
Sniper Rifle: (carried by Ranger) Primary fire is a long range instant hit weapon that leaves a team coloured trace for a couple of seconds. Secondary activates the zoom which is adjustable usually with the mouse wheel. While powerful, against pedestrian players at least, your location is given away by the traces so don't stay in one position for long. The clip only holds three bullets and refire rate is slow so don't use this weapon for close combat unless its a last resort.
Pistol: (carried by Ranger) Primary fire is a relatively high power instant hit. Secondary is rapid fire but at lower accuracy. Suitable for close to medium range combat but you need to be accurate.
Shock Lance: (carried by Ranger) Primary fire sends out high speed electrically disruptive bolts, ideal against vehicles. Secondary fire is more destructive but at a cost of more ammo and is slower moving, best used close in against slow vehicles or at further range against turrets. This can be used against players but you will need a high number of hits to get a kill.
Assault Rifle: (carried by Tech) Primary fire is a medium range instant hit with a high rate of fire. Secondary fire is again more powerful but releases medium speed shells and is hard to use against players, stick instead to turrets and vehicles.
Shotgun: (carried by Tech) Primary fire is a close to medium range wide spread of shot. Secondary releases small incendiary packages in a close range spread. Don't even think of engaging an enemy at range with the shotgun, but up close it's very powerful. Enemies caught on fire with the secondary will have their vision slightly impaired while being damaged so it's a good tactic to use this then switch to primary as they attempt to flee.
Rocket Launcher: (carried by Gunner) Primary fire releases a slow moving, high power warhead. Secondary either releases a single missile which immediately splits into four smaller warheads which proceed on a drunken path, or can be held down while aiming over a target or targets to acquire up to four locks, one for each of the four warheads. When using primary it's best to be higher then your opponent so that you can fire down on him, this way even if you miss there's a good chance that he will catch some of the splash damage when the rocket hits the ground near him. The secondary warhead tends to drop initially before it splits, so even when firing with a lock it's best to aim up high to give the rockets some altitude before they proceed in to target. The locked warheads are relatively dumb and can impact against objects obscuring the target but some clever aiming of the intial rocket can help overcome this.
Flamethrower: (carried by Gunner) Primary fire is a short range jet of flaming napalm. Secondary sprays the napalm out un-ignited ready for an unsuspecting player to run across and burst into flames. Bear in mind that you're effectivly blind to your intended victim while blasting out primary fire so it's advisable to use this in bursts, re-aquiring your target before re-commencing fire. It also tends to be shorter range than you would want.
Frag Grenade: (carried by Ranger) An explosive grenade that impacts an area with splash damage even if you don't hit your enemy directly.
Smoke Grenade: (carried by Ranger) Ideal for concealment while hacking or retreating from enemies.
EMP Grenade: (carried by Tech) Massive damage against machinery and ideal for use against force walls and autoturrets set up to protect an artifact node.
Toxic Grenade: (carried by Tech) Releases a nasty cloud of yellow gas which is harmful to life but ineffective against machines. Good for boxing in an enemy especially indoors.
Incendiary Grenade: (carried by Gunner) On impact this releases multiple packets of explosive napalm to ignite anyone in that area. Will impair a players vision slightly while they are on fire as well as being damaged.
Concussion Grenade: (carried by Gunner) Effectively a flashbang, minimal damage but any players in its area of effect will be blinded and deafened for a time. The closer to the impact the longer lasting the effect.
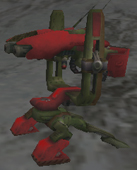
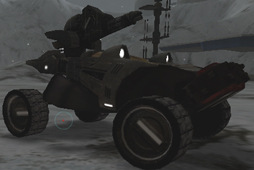 The fastest of the vehicles, the Raptor | 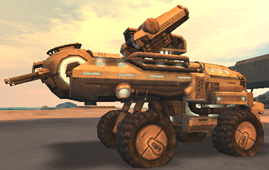 The Harbinger can carry 3 players | 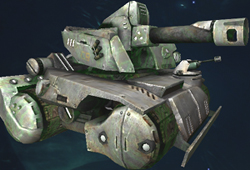 The largest of the vehicles, the Juggernaut |
Three vehicles are available in the game although they aren't all available in all the maps, FreeFall for example has none, Garden has two and SunsetBeach has them all. Here's a quick rundown.
Raptor:
+ A high speed buggy capable of amazing turns of speed and very maneuverable.
- Little armour means you don't want to tangle with heavier vehicles and watch out for players ganging up on you with small arms fire.
Weapons: A rapid fire machinegun topmounted provides 360 degree coverage of the surrounding area. The Raptor also has grinders mounted to the front to chew up and spit out enemy players who don't see you coming.
Crew: One driver and one top gunner.
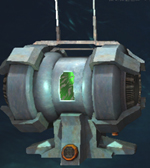
Harbinger:
+ Well defended personnel carrier, just happens to look like a bus.
- Better armoured than the Raptor but anti-machinery weapons will still turn this to slag in no-time.
Weapons: Topmounted 360 degree coverage again, this time from a rocket launcher and theres also a rear mouted EMP cannon to discourage persuit.
Crew: One driver and two gunners, one on top and another behind.
Juggernaut:
+ This tank can take a pounding and has the capability to unleash havoc.
- Very slow speeds mean that your practically a sitting duck. Don't miss with that top cannon or EMP fire will be coming this way very soon.
Weapons: Main cannon is hugely powerful but slow to reload, covers all around the tank. Unique to this vehicle is a driver controlled front mounted flame thrower, this is very short range but can help against Techs lobbing EMP Grenades in your direction.
Crew: One driver and one top gunner.
Not everyone realises that all vehicles have a turbo capability accessed via the Sprint key. In the Raptor this gives a short lived but large increase in speed, the Juggernaut gets a short, small boost and the Harbinger gets a slightly longer lived medium speed increase. As with personal sprinting it's best to save these for key moments as while they recharge, it takes time that you can easily die in when you've gained the attention of EMP wielding enemies.
All vehicles work best with the full complement of players aboard, you're really not going to last long in anything if you drive around alone. All vehicles work well for Tech transport though the Tech should really drive. This way he can hop out and HACK EVERYTHING (see above) while his teammate mans the heavy weaponry to provide cover. Running this tactic can get your team an early start on powering those gadgets. The Raptor makes a good artifact escape vehicle due to it's speed, but be aware that you're even more of a target and be ready to bail out before the thing explodes in a hail of heavy turret plasma bolts. Also be aware that you can carry players on top of the vehicles for additional firepower from their weaponry, the Raptor is the least suitable vehicle for this though as it's so fast and bouncy.
Remember a vehicle is a nice weapons platform even if it's not being driven. A canny Ranger who's been pounced on by a Gunner can make effective use of any nearby abandoned vehicle turrets to turn him from a 7 stone weakling into a massive, armoured killing machine. Practice getting into the turret when under pressure, know where to aim your crosshair so that you dont jump into the drivers seat instead and just turn yourself into a bigger target.
When you are done using a vehicle that spawned at your base, blow it up. This spawns a new one at your base for your teammates to use. If you leave it in the field, you cripple your team, or worse it could be used against you. This tactic works in reverse, taking the enemy's vehicles out of their base slows them down. For instance, XMP-Sirocco will often see the Juggernauts in each base used for defense. If you steal the Juggernaut and hide it somewhere, you hurt their defensive capability. Remember to get the heck out of the vehicle when it hits 50% health
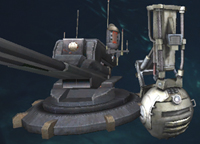
 Machine gun turret | 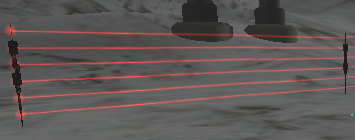 Tech Forcewall | 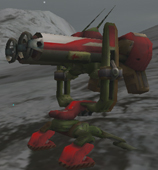 Rocket Launcher turret |
Tech forcewalls are useful in pretty much only the following circumstances:
- temporary protection from snipers while you hack, revive a teammate or set up autoturrets.
- clogging an artifact node to slow down the enemy invaders.
- stopping incoming vehicles.
- surrounding a teleporter (to stop enemies from exiting easily) or a jumppad (to stop enemies from using it, three around the pads in your base on Nakoja does a lot to stop attackers).
You can walk through a friendly forcewall by "using" it. When it turns green, you can walk/shoot through it. So can enemies though. And if you haven't figured it out yet, you don't want to be in the middle of that field when its no longer green.
An autoturret's cone of view covers the area you are facing when you place it. If you want a turret to fire in a certain direction, you should be facing in that direction.
Place multiple turrets at angles to provide cross fire. Consider the following quick, cheesy diagram:
[X]
Think of it not as an X in brackets, but as a room with 4 turrets in it. If all 4 turrets are angled towards the center of the room, they will all aim and fire at someone walking in, while they need to look in all 4 directions to hit the turrets.
Place turrets high. They'll be harder to jump over, and cover more area. Rocket turrets are most effective when up high, since the rocket explosion will splash damage opponents. You also don't want to place turrets anywhere that a vehicle can run them over or shoot them easily. Try to place them so there is no wall/hill directly behind them where grenades/rockets can land for splash damage.
Machine gun turrets are more effective than rocket turrets in open areas. They are small, so harder to hit from a distance and they are also your best chance of hitting a ranger (who moves through faster than rocket turrets can track). These turrets are especially effective in the base on Nakoja when positioned right, as they will track and hit airborne targets (the guys on the bounce pads).
You can pick up turrets using the Hack/Use key. If a turret is damaged, or facing the wrong way, use it to pick it up and place it again. You can also "stockpile" turrets at a resupply point by:
1. place turret
2. resupply
3. repeat 1 and 2 until you have a bunch of turrets humming away
4. pick them all up.
This can take a while due to low energy recharge rates, but its much better than "taking a trip to the store" when you need to set up strong defenses in a remote location and your Gunners just downloaded the game yesterday and don't speak English.
It's better to place a few smart turrets then tons of sloppy ones. Each energy source can handle about 6-8 turrets before you start seeing drain (on a full server, far less when only a few people are playing). Think about the best positions for a wide area of coverage before you start dropping them.
Hopefully this will help get most people into a position where they can enjoy the game without wrestling with what the hell is going on and be able to hold their own against other players. Good luck and above all, have fun.
Big thanks for some of these tips go to 950Ravage, an XMP Beta tester.